-
웹개발자의 iOS 개발기(7) - [SwiftUI] 모달, 네비게이션, 탭뷰iOS 2025. 1. 26. 01:09
모달, 네비게이션, 탭뷰에 대하여 공부해 보았습니다.
01. 여러 화면을 이동하기
Modal
import SwiftUI

struct _1_Modal: View {

    @State var showModal: Bool = false

    var body: some View {

        VStack {
            Text("메인 페이지 입니다.1")
            Button {
                showModal = true
            } label: {
                Text("Modal 화면 전환")
            }
        }
        .sheet(isPresented: $showModal) {
            _1_Detail(isPresented: $showModal)
        }

    }
}

#Preview {
    _1_Modal()
}
Detail
import SwiftUI

struct _1_Detail: View {

    @Binding var isPresented: Bool

    var body: some View {
        Text("모달 페이지 입니다.2")
        Button {
            isPresented = false
        } label: {
            Text("닫기")
        }

    }
}

#Preview {
    _1_Detail(isPresented: .constant(true))
}
@Binding
- 부모뷰에서 자식뷰에 데이터를 전달할 때 사용
- 부모뷰가 상태값을 소유하고, 자식뷰가 이를 수정해야 할 경우 사용
@Binding 주의점
- 상태 소유는 부모에서만: 자식 뷰는 상태를 소유하지 않습니다. @Binding은 항상 부모에서 소유한 상태를 참조한다.
- 데이터 흐름: SwiftUI는 단방향 데이터 흐름(Unidirectional Data Flow)을 기반으로 설계되었다. @Binding은 이 흐름을 해치지 않고 데이터 수정 권한을 자식에게 잠시 위임하는 역할을 한다.
- 값이 없는 경우 처리: 만약 부모 뷰가 상태를 제공하지 않으면 런타임 에러가 발생한다. 이를 방지하려면 적절히 상태를 초기화해야 한다.

모달 02. 네비게이션 써보기
NavigationStack, NavigationLink, toolbar 사용해 보기
import SwiftUI

struct _2_Navigation: View {

    let titles = ["디테일뷰로 이동하기", "디테일뷰로 이동하기2"]
    let descriptions = ["데스티네이션 입니다.", "데스티네이션 입니다.2"]

    @State var showModal: Bool = false

    var body: some View {
        NavigationStack {

            List {
                ForEach([0,1], id: \\.self) { index in
                    NavigationLink {
                        Text(descriptions[index])
                    } label : {
                        Text(titles[index])
                    }
                }
            }

            .toolbar{
                ToolbarItem(placement: .automatic) {
                    Button {
                        showModal = true
                    } label: {
                        Text("Add")
                    }
                }
            }

            .sheet(isPresented: $showModal, content: {
                Text("아이템 추가 페이지 입니다.")
            })

            .navigationTitle("네비게이션")
        }
    }
}

#Preview {
    _2_Navigation()
}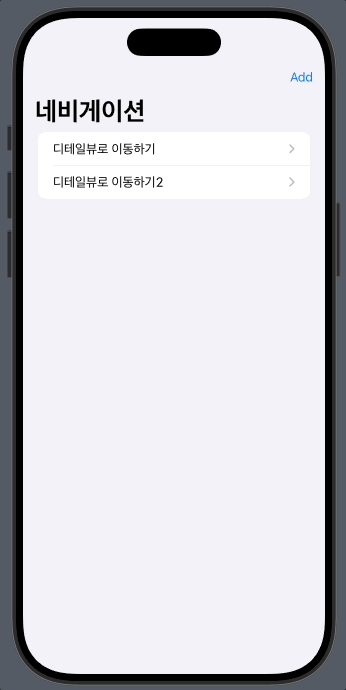
네비게이션 03. 탭뷰로 그려보기
import SwiftUI

struct _3_MyTab: View {
    var body: some View {
        TabView {
            //_3_TabDetail()
            _4_OnBoarding()
                .badge(2)
                .tabItem {
                    Label("Received", systemImage: "tray.and.arrow.down.fill")
                }

            //_3_TabDetail2()
            Text("Sent 화면입니다.")
                .badge(2)
                .tabItem {
                    Label("Sent", systemImage: "tray.and.arrow.up")
                }

            //_3_TabDetail3()
            Text("Account 화면입니다.")
                .badge("!")
                .tabItem {
                    Label("Account", systemImage: "person.crop.circle.fill")
                }
        }
        //.tabViewStyle(.page(indexDisplayMode: .always))
    }
}

#Preview {
    _3_MyTab()
}
탭뷰 04. 여러 개의 화면을 이어서 만든 앱
import SwiftUI

struct _4_MyApp: View {

    @State var showModal: Bool = false

    var body: some View {
        TabView {

            _4_List()
                .tabItem {
                    Label("first", systemImage: "tray.and.arrow.down.fill")
                }

            Text("두번째 페이지")
                .tabItem {
                    Label("second", systemImage: "tray.and.arrow.down.fill")
                }

            Text("세번째 페이지")
                .tabItem {
                    Label("third", systemImage: "tray.and.arrow.down.fill")
                }

            Text("네번째 페이지")
                .tabItem {
                    Label("fourth", systemImage: "tray.and.arrow.down.fill")
                }


        }
        .sheet(isPresented: $showModal, content: {
            TabView {
                _4_OnBoarding1(onboardingTitle: "온보딩 1", backgroundColor: .blue)

                _4_OnBoarding1(onboardingTitle: "온보딩 2", backgroundColor: .green)

                _4_OnBoarding1(onboardingTitle: "온보딩 3", backgroundColor: .yellow)

                ZStack {
                    Color.gray.ignoresSafeArea()
                    VStack {
                        Text("온보딩4")
                        Button {
                            showModal = false
                        } label: {
                            Text("Start")
                        }
                    }

                }
            }
            .tabViewStyle(.page)
        })
        .onAppear {
            showModal = true
        }

    }
}

#Preview {
    _4_MyApp()
}
간단한 앱 구조 'iOS' 카테고리의 다른 글
웹개발자의 iOS 개발기(9) - [UIKit] AutoLayout (0) 2025.01.26 웹개발자의 iOS 개발기(8) - [UIKit] UIKit 입문 (0) 2025.01.26 웹개발자의 iOS 개발기(6) - [SwiftUI] 리스트 (0) 2025.01.25 웹개발자의 iOS 개발기(5) - 예외 처리, 프로토콜, 제네릭 (0) 2025.01.24 웹개발자의 iOS 개발기(4) - 옵셔널, 옵셔널 바인딩, 체이닝 (0) 2025.01.19